Mission Inspiration October - Danse Macabre
I must learn not to judge my efforts at art journaling until the page is actually complete. For the third month in a row I followed the Mission Inspiration prompts and really didn't like what I was doing until I had completed step 8. The last two steps just put the icing on the cake. I actually love the finished piece even though I'm really not really a Halloween person!
 |
| Step 1 |
Step 1: Add black gesso with a baby wipe.
A little uneven maybe, but I could cover up any imperfections.
 |
| Step 2 |
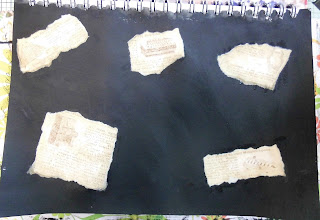
Step 2: Add torn magazine advert fragments. For this I used a piece of backing paper from The Busy Scrapper's Solution for Heritage Pages by Paper Pizazz. The adverts were for musical instruments and just the right size to fit the journal page. I tore around each advert and went over the edges with Mudstone Artistry ink before gluing each advert randomly to the page. Unfortunately the picture didn't come out very clearly.
 |
| Step 3 |
Step 3: Add texture paste through two different stencils. I used Copper Dreamweaver embossing page through the Twisted layering stencil by Tim Holtz (THS065), then mixed some Carved Pumpkin distress paint with some of the Cosmic Shimmer clear texture paste to provide a translucent orange effect through the Rays layering stencil (THS003). I didn't entirely like the result, as some of the texture paste seeped under the stencils as it was difficult to keep them completely flat to the page.
 |
| Step 4 |
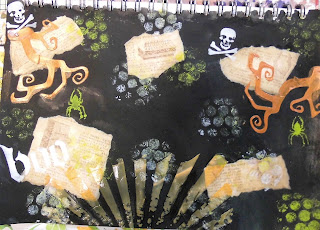
Step 4: Add paint or spritz with two different colours. For this, I decided to follow Mike Deakin's lead and add the paint through a stencil. The first stencil that I used was the Crossbones stencil (THS064) with Titanium White acrylic paint, I used the same colour through the 'Boo' on the Halloween Script stencil (THS0063). The spider from the same stencil was added using Citrus Adirondack paint.
 |
| Step 5 |
Step 5: Make marks with bubble wrap. I stuck with the Citrus and Titanium White paint and added random splodges with a small piece of bubble wrap.
 |
| Step 6 |
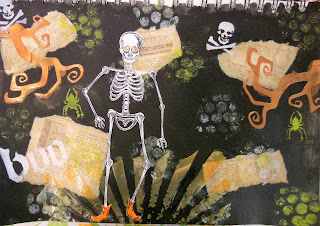
Step 6: Add a focal collage image. For this step I decided to use the Dancing Skeleton Perfect Partners stamp and die sets designed by Sheena Douglass. I die cut the individual pieces first, then pressed them down onto each stamp inked with black archival ink. Before adding them to the page, I coloured the boots with the Carved Pumpkin distress marker.
 |
| Step 7 |
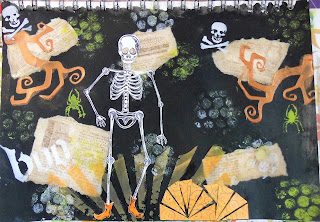
Step 7: Glue small triangles of patterned paper randomly. OK, I admit that the triangles are not so random! I used them to create two 'pumpkins' at the bottom of the page, having coloured some patterned paper with Carved Pumpkin distress ink.
 |
| Step 8 |
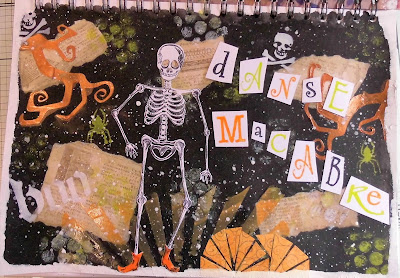
Step 8: Add a quote or phrase like a ransom note. The phrase was easy to choose given the adverts for musical instruments and the skeleton focal point. I have the perfect set of alphabet stamps to create the feeling of a ransom note; the Alphabet Word Chain set by Claritystamp. I used a mixture of upper and lower case stamps and alternated between Black Archival, Adirondack Citrus and Distress Carved Pumpkin inks. Each letter was cut out individually, helping to cover up some of the imperfections with the texture paste. This was the point when I finally started to like the way that the page was coming together.
 |
| Step 9 |
Step 9: Add a border of your choice. I felt that the page was already 'busy' enough, so chose to add a simple white border around the edge using a paintbrush and Titanium white paint. This had several advantages; it helped match the sides and bottom of the page to the top where I hadn't been able to add the black gesso between the spiral wire, it gave the skeleton something to stand on and it hid some more of the imperfections with the texture paste step.
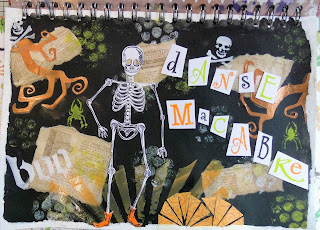
Step 10: Finish with drips or splatters. I added plenty of water to the paint left over from step 9 and used my Tim Holtz Splatter Brush to add lots of white splatters to the page. Not only do they help tie the whole concept together, but I also think that they look like stars in a night sky.
 |
| Step 10 - Love it! |


No comments:
Post a Comment